2.2 Uploading Data
If you want to ingest data from a file, it should be first uploaded to Momentum server, and then ingested. For example, if you want to ingest data from CSV, Excel, text, JSON, XML or images, the files must be present in the Momentum server. There are two ways to make the files available on Momentum server:
- Via SFTP/SCP upload: large files are recommended to be uploaded via SFTP/SCP. This mechanism also allows to automate the upload process. Your system admin should be able to setup the SFTP/SCP directory on the Momentum server. AWS single node Momentum does not support this feature out of the box. However, to enable this feature, contact our support.
- Via browser drag-and-drop: This is the most convenient method to send the files from your local computer to Momentum. The steps to upload a single file or multiple files are:
- From left hand side navigation panel, click “Data Upload & Exploration”.
- Click “Upload” located on the top menu option.
- Give a directory name where you want to upload the files.
- If the directory exists, the files will be uploaded to that directory.
- If the directory does not exist, it will be created and the files will get uploaded to it.
- To upload to subdirectories, use the back-slash “/” in the directory name. E.g. machine/training directory implies a subdirectory “training” within the parent directory “machine”.
- Either click “Browse Files” or drag one or more files from your local computer’s file system and drop on to the rectangular area indicated so.
- Click “Submit” button to transfer the files.
- It may take a while to upload large files or large number of files.
- Figure 2.2 shows a screenshot example of file upload via drag-and-drop.

Figure 2.2: Data upload via drag-and-drop
Checking File Upload
To check if the file/s were uploaded correctly:
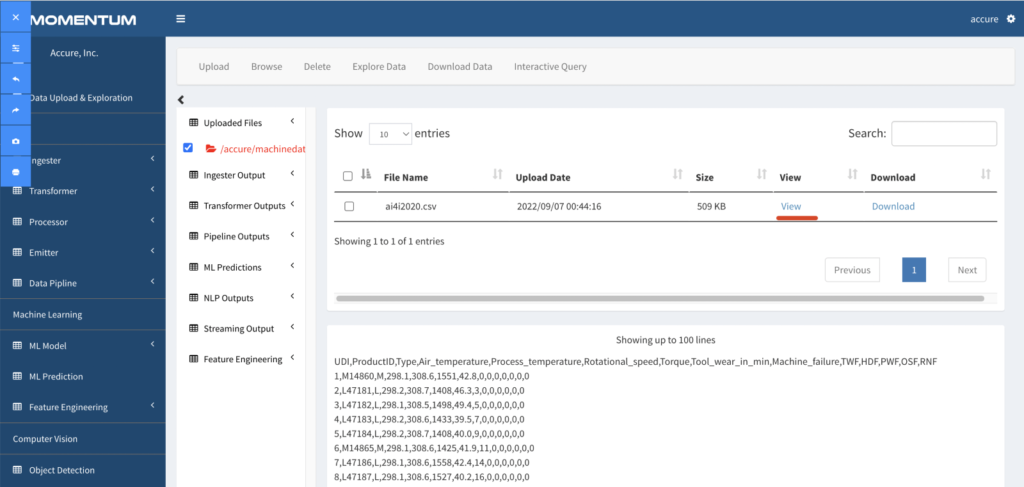
- From the “File Upload and Exploration” screen, expand the “Uploaded Files” section and click on the directory name that you created in the previous step.
- If the files were uploaded, you will see a list of all files uploaded successfully.
- Click on the file name to display up to 100 lines of the file.
- Figure 2.3 below illustrates the process of checking the file upload.

Figure 2.3: Screen to check where files were uploaded successfully
Important Note
The file upload process needs to be repeated as many times data file needs to be ingested. In other words, every time data needs to be ingested, the file must be uploaded to the directory.
Also, note that the data from the directory is moved to an archived location and this directory is emptied when an ingester ingests the data, so that the directory is available for a new set of data to be ingested.
.